Upgrade Your Whatsapp with Speech-to-Text Using Whisper AI

You've probably heard about OpenAI and all of their cool inventions, particularly ChatGPT which is one of the most interesting ones. A couple of weeks ago, OpenAI released the API for ChatGPT and I decided to make something out if it. I had hoped this build would be on something using the newly released GPT-4 APIs but sadly i do not have access to that yet. Bummer, yes.
My first use of the API was to build a WhatsApp bot that I call Ava. I wanted a way to be able to use ChatGPT without needing to open a browser tab and log in to my OpenAI account. Believe it or not, setting up the entire thing took less than 3 hours.
First I added the regular function of being able to send a message, ask a question and get a response.
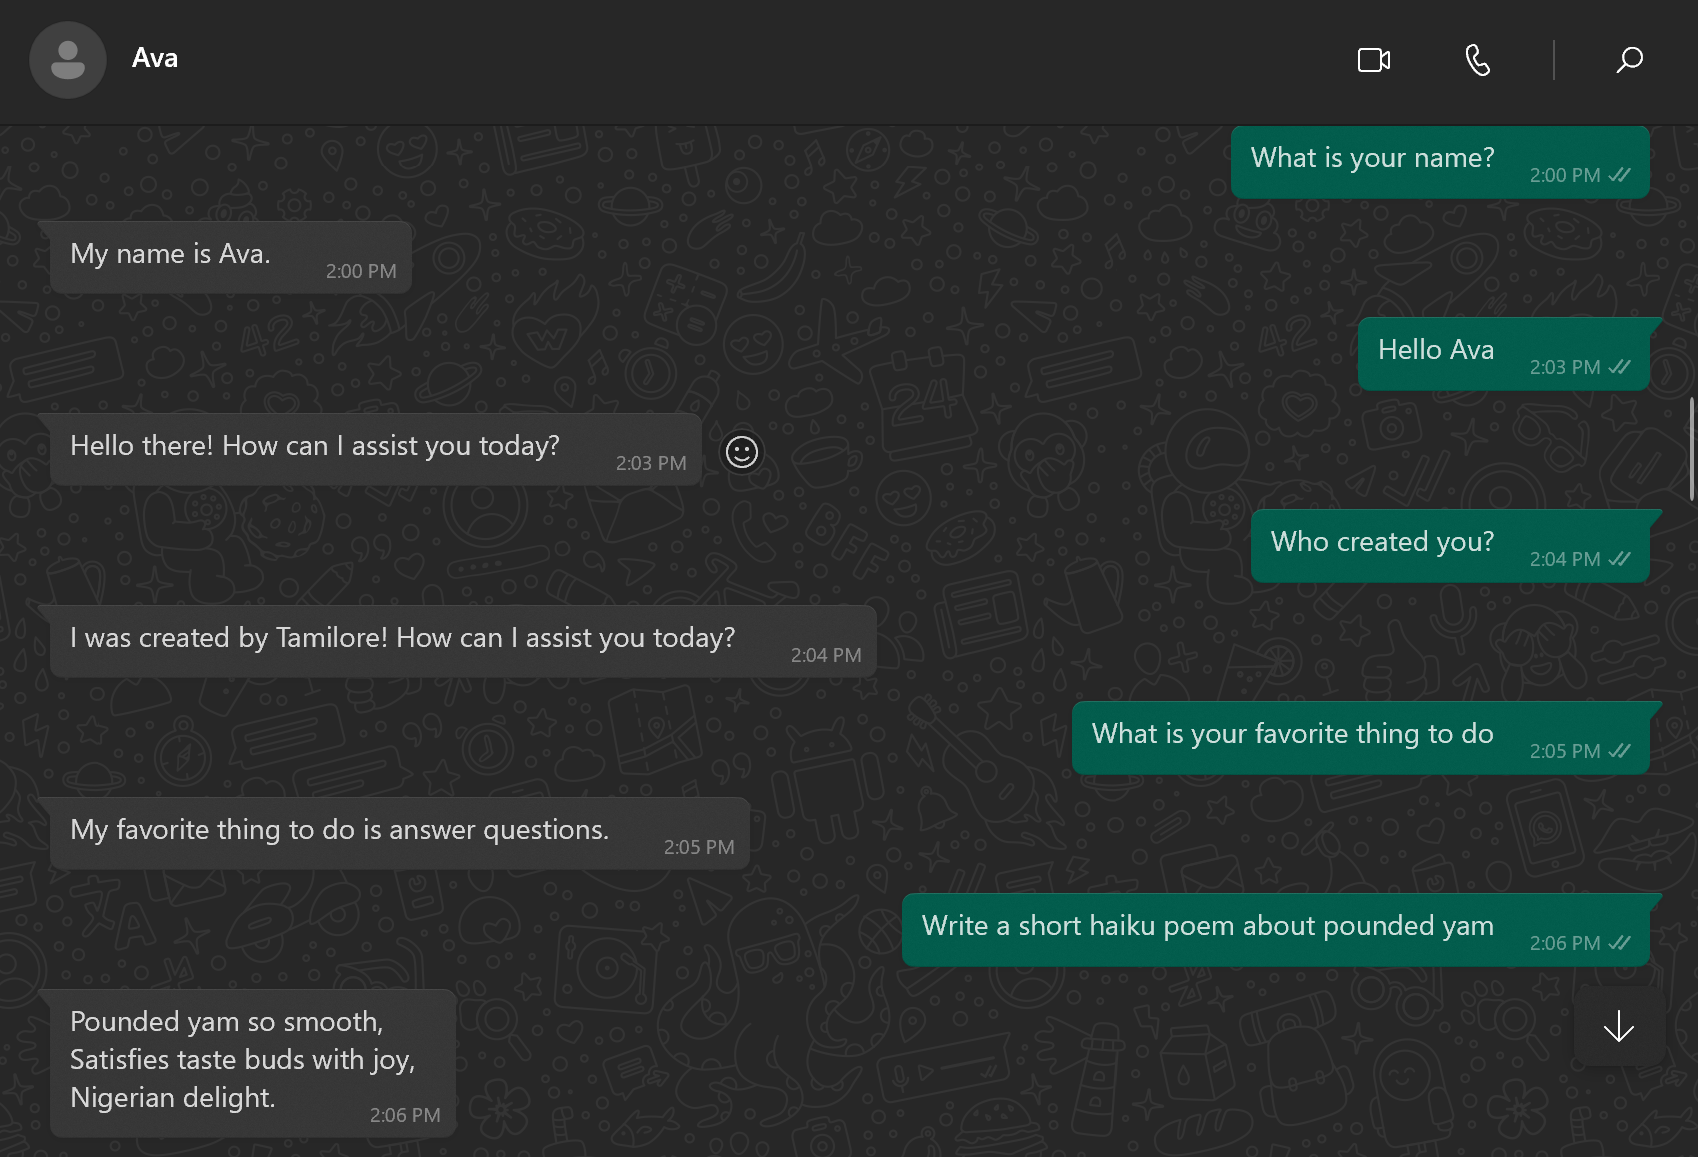
Then I added speech to text functionality with Whisper AI so I could use voice notes whenever I wanted to and that is what we'll be learning in this build.
Here, we are making use of Whatsapp for the bot but it'll be pretty much the same for any other application that you want to give a speech-to-text functionality. So let's get started.
Toolstack
For this build, I'm going to be using:
- Whisper AI
- Make
- Convertio
How it works
Whenever you record and send a voice note to your WhatsApp bot, it'll trigger a Make scenario that takes that recording, converts it to an mp3 file, calls the Whisper API, then calls the ChatGPT API and finally sends the response back to you. Sounds pretty straight forward, yeah?
Checklist
- Set up Whatsapp on your Facebook Business Manager account
- Set up your scenario on Make
Let's build
Set up Whatsapp on your Facebook Business Manager account
We're going to skip the first step so we get right to the automation part but that's because there's a pretty explanatory article on how to set it all up on Make. You can read it here.
Set up your scenario on Make
Once you have your Whatsapp set up, it's time to start stacking modules in Make. Search for the Whatsapp Business Cloud module and select the trigger to watch events.
The first time you use this module, you'll need the permanent token from setting up Whatsapp on your Facebook Developer account. Make needs this for a seamless connection but don't worry, you only need to do this once.
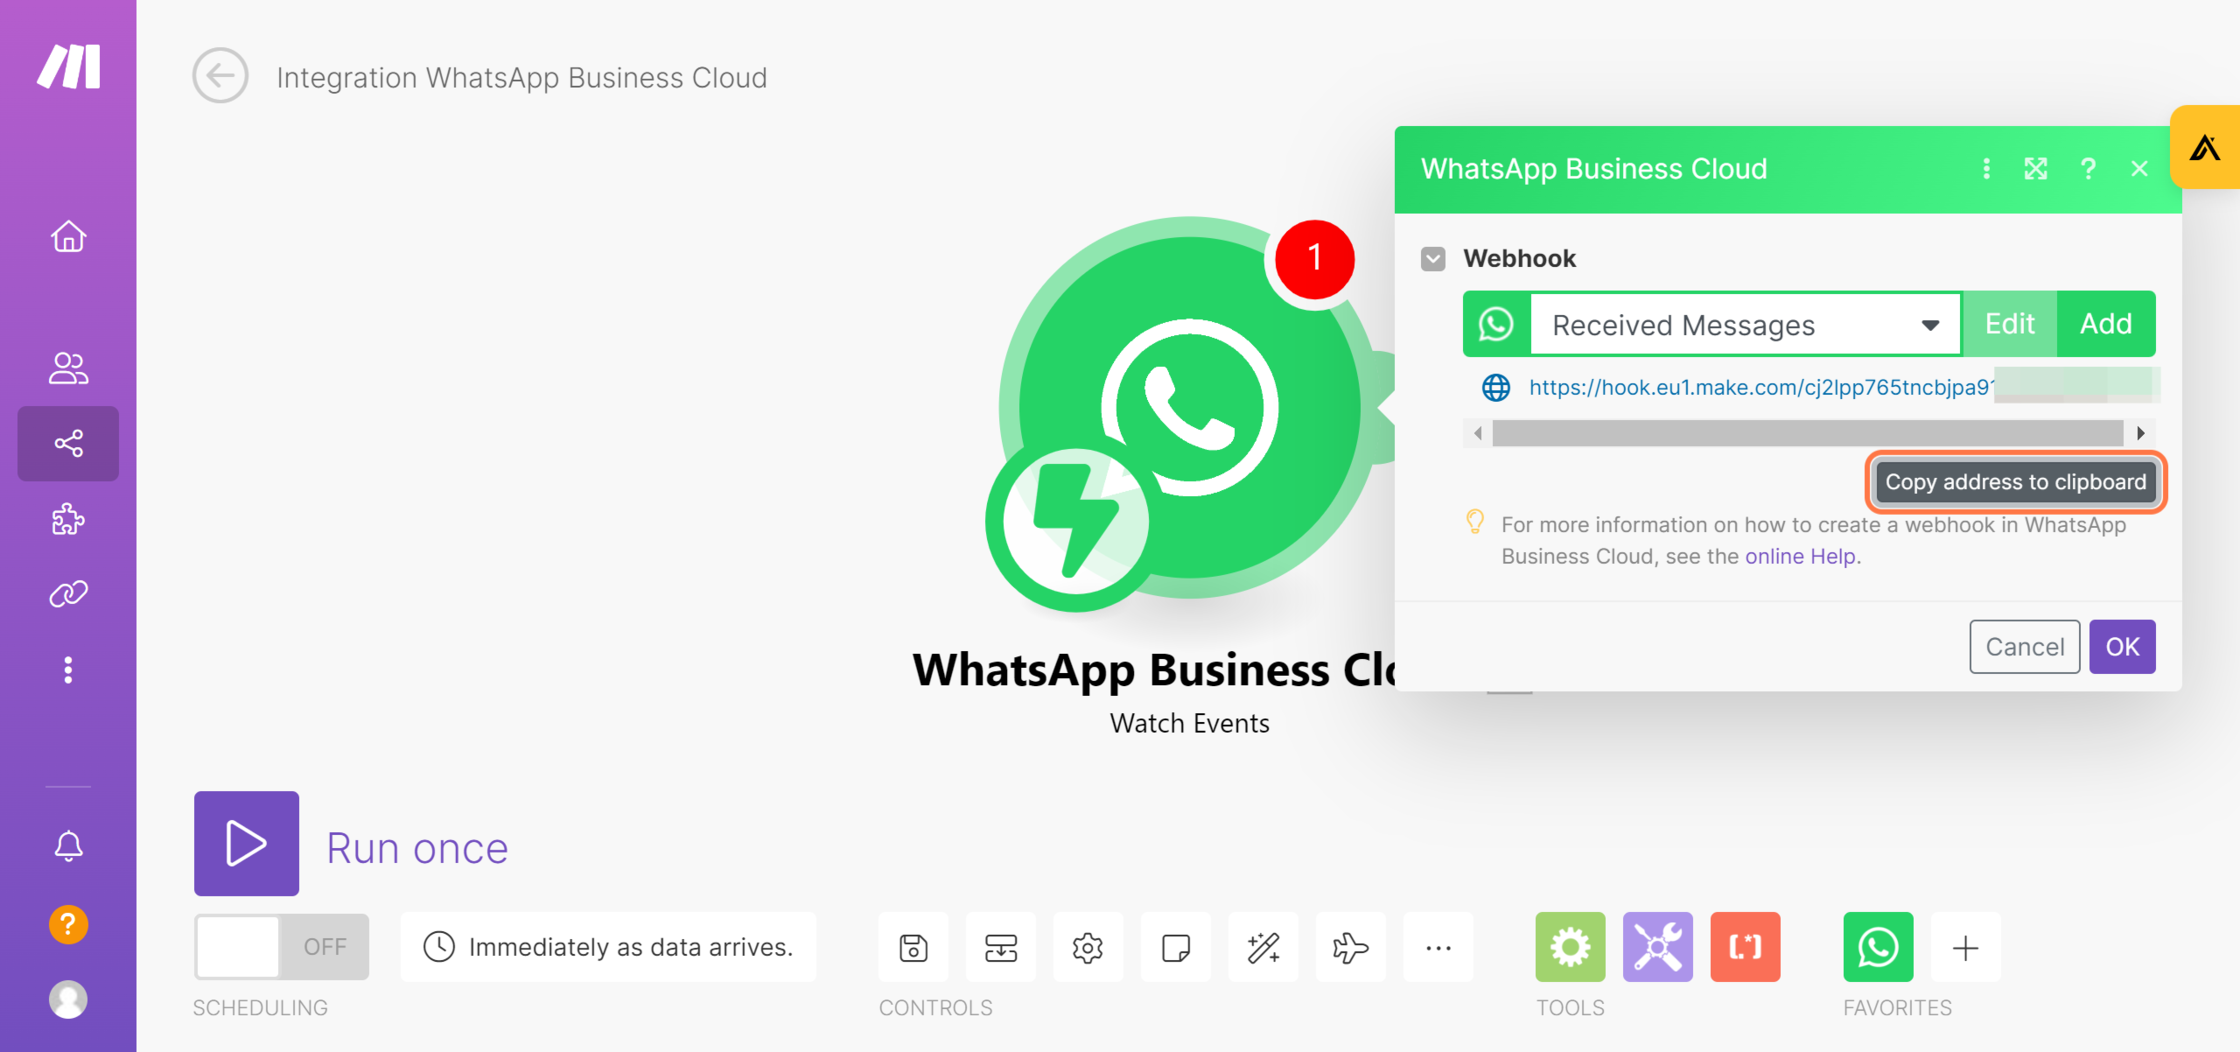
Once that is done, you'll get a generated webhook link, copy that and head over to your account on Facebook.
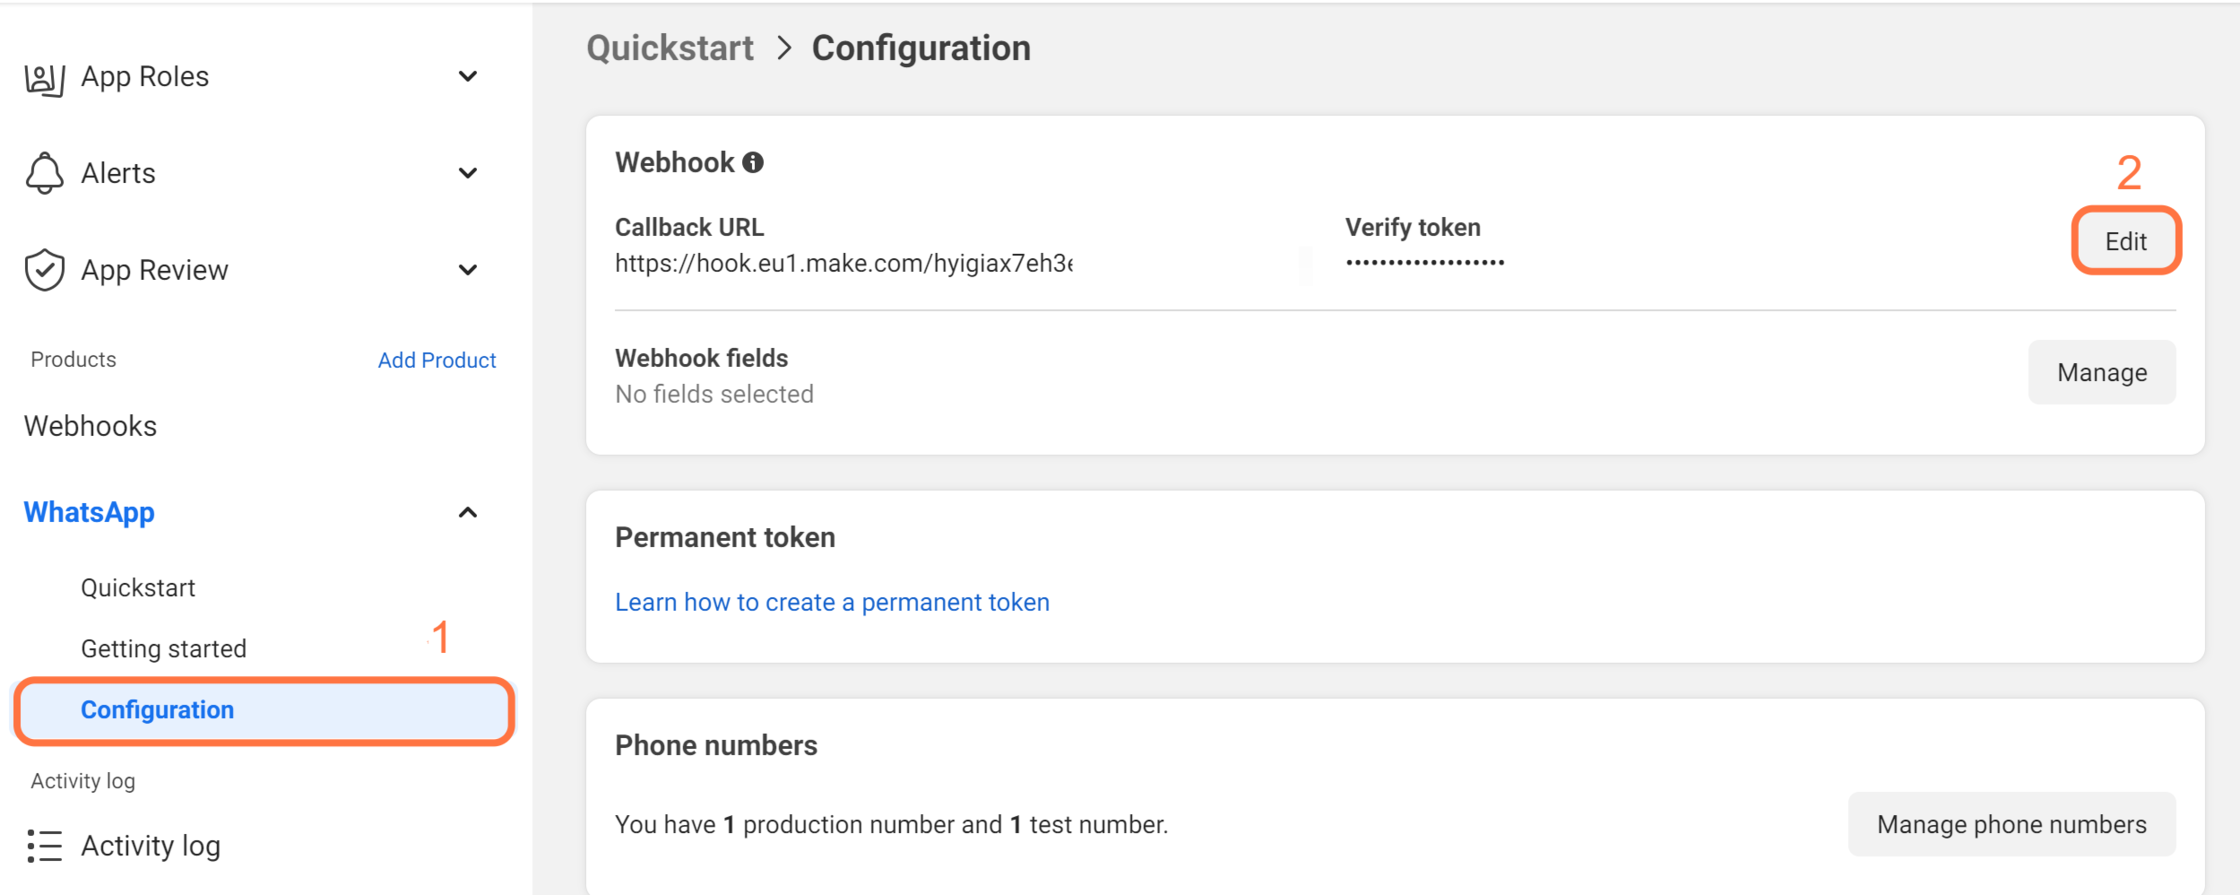
Navigate to the Configuration tab, there you'll find fields to set up the webhook for your Whatsapp bot. I already had mine set up but the process is the same when adding a new webhook URL.

Enter the webhook URL you copied from Make as well as your permanent token from Whatsapp. Verify and save.

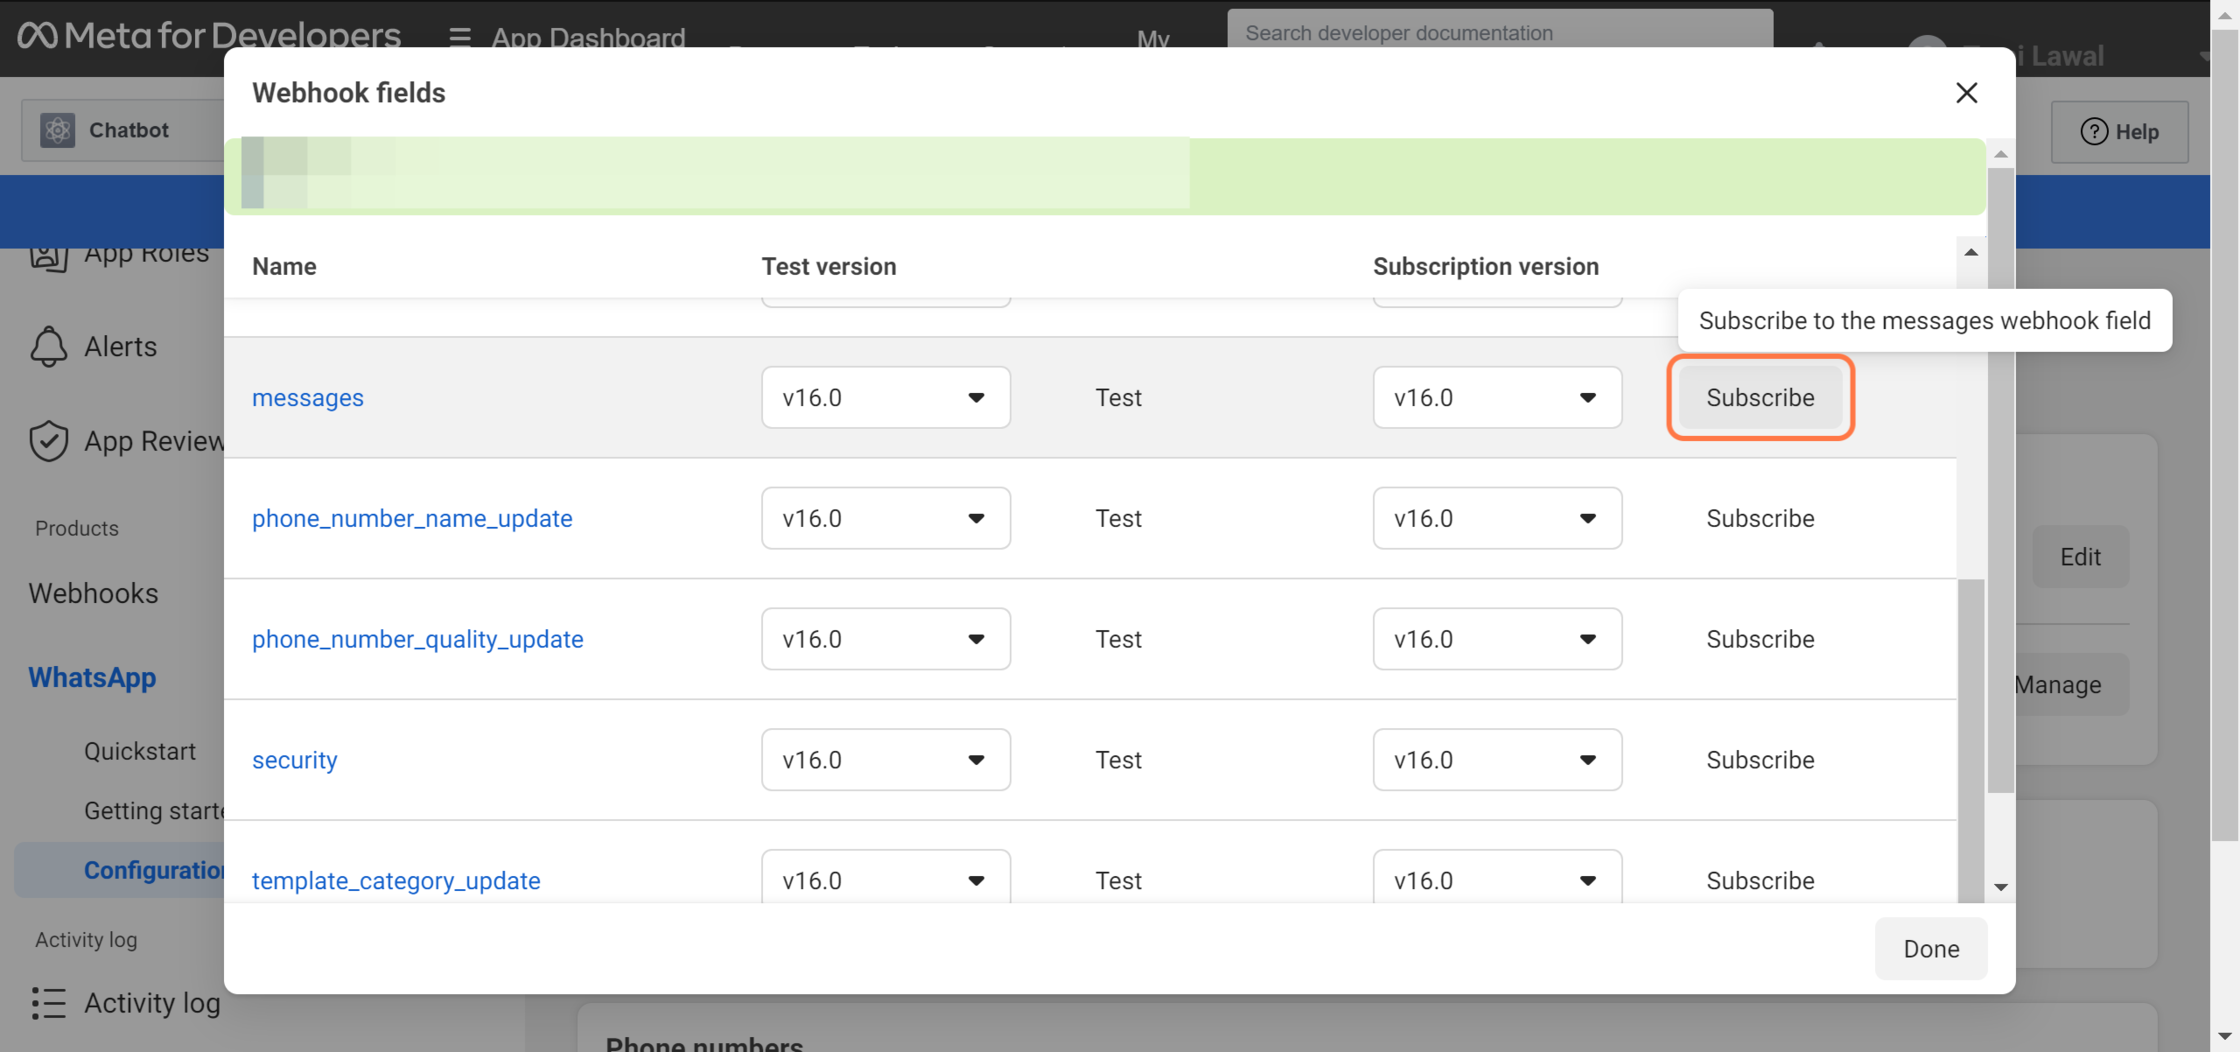
However, to ensure you are getting notified when there's a message sent to the Whatsapp bot, you need to subscribe to the event. Click on 'Manage' and scroll till you find 'messages'. Hit the Subscibe button and that's it. Now everytime a message is sent to your Whatsapp bot, the Make scenario is triggered and starts running. Let's head back to Make.
You've successfully set up the first module, the next module is also Whatsapp Business Cloud but with the action to 'Download a Media'. This module allows you reference an audio file received from Whatsapp by its ID in order to download it.
This is one in the many data fields that get sent via the trigger module everytime you get a message on Whatsapp. But right now we're focusing on the audio data which you can find under 'Messages[]' along with all the other message types; Text, Image, Audio, Document, Stickers etc.
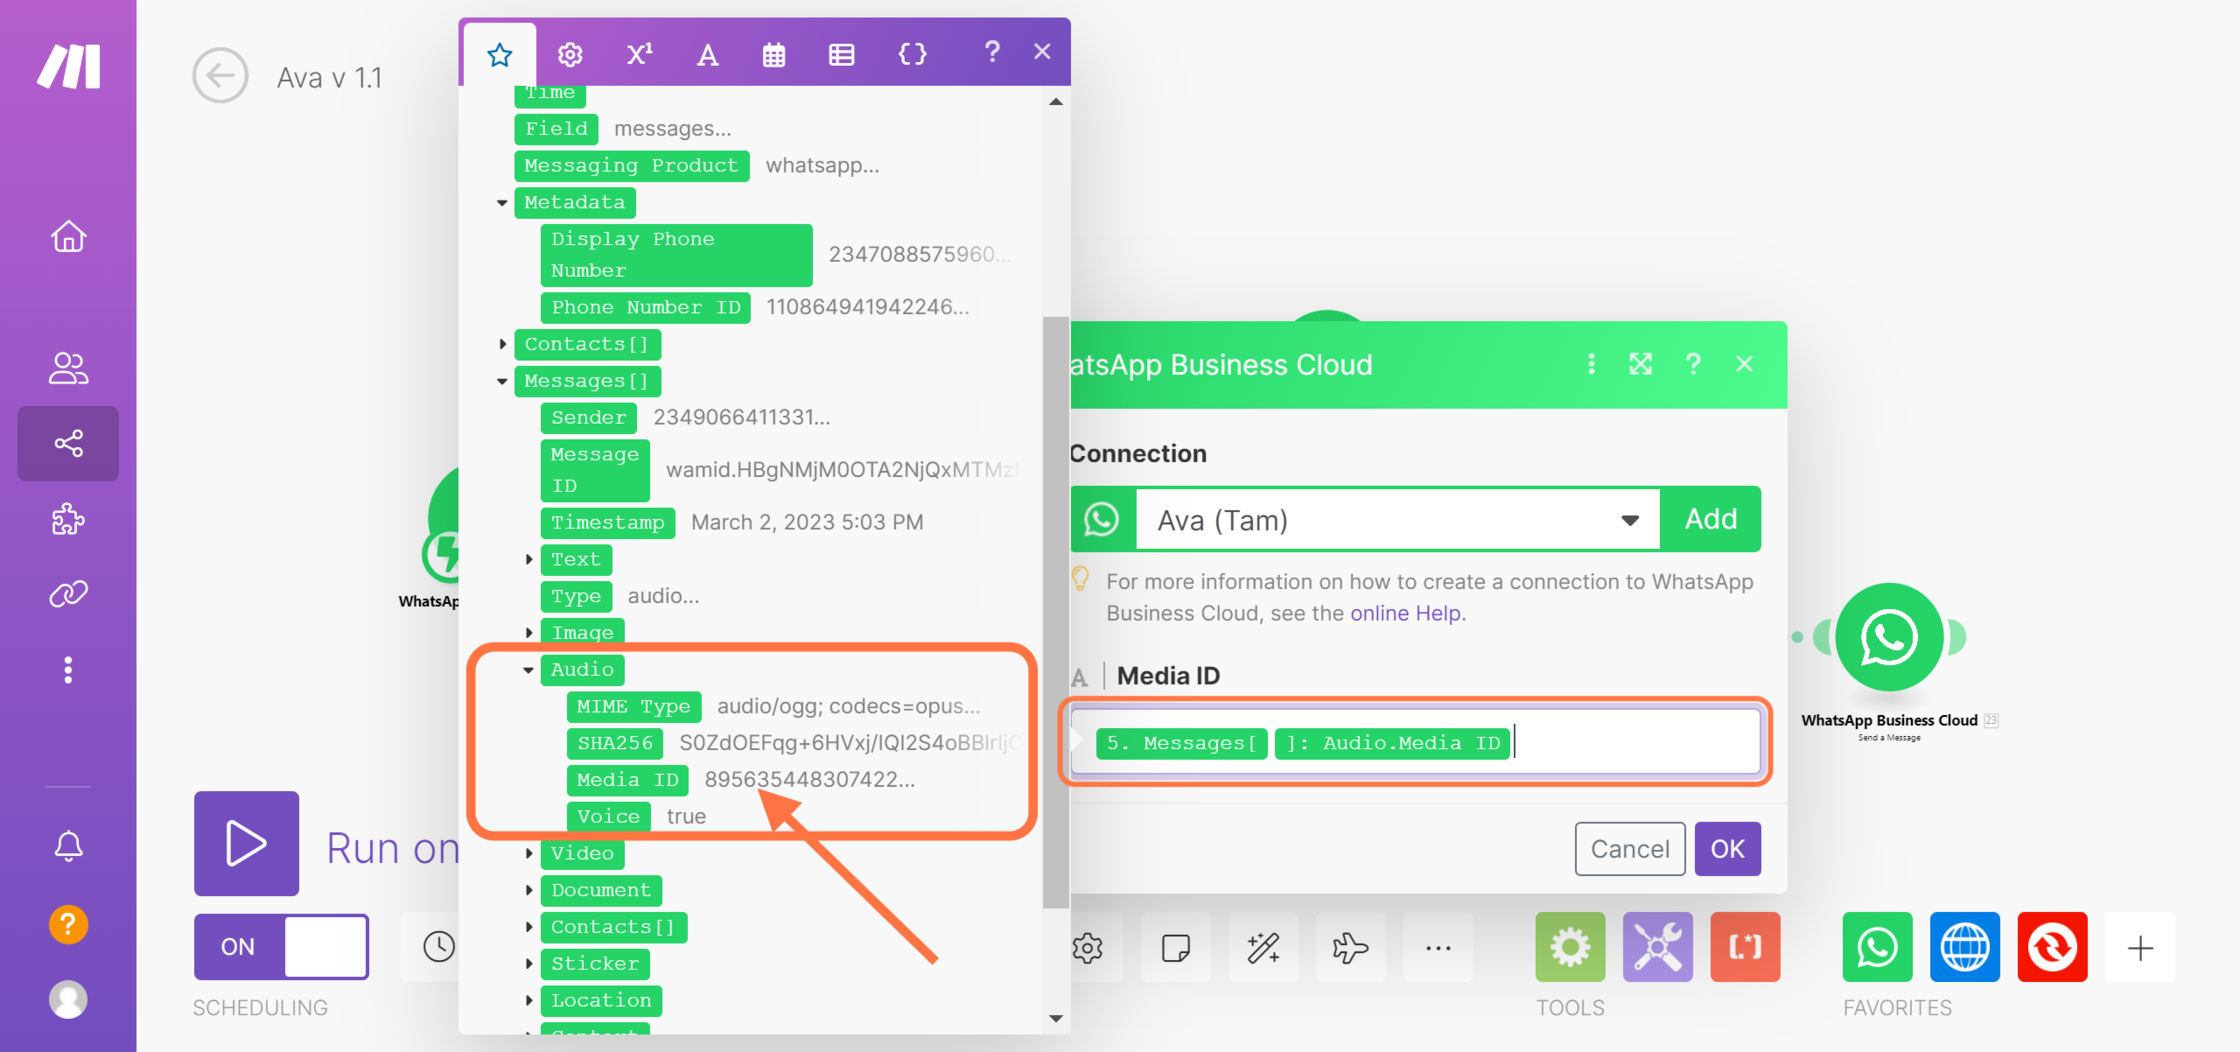
Click on the audio dropdown to reveal some more data. There you'll find the 'Media ID' we need to download the audio file.
To use the downloaded audio file with the Whisper API, it needs to be in an mp3 format and unfortunately that isn't the default format we get from Whatsapp so for our next module we need a converter. There are several converters you can choose from but for this build, I chose to go with Convertio.
Create an account and get your API Key here, you'll need it in the next step. With Convertio, you get a daily limit of 25 conversion minutes for free.
Search and select the Convertio module, add your API key and connect with Make. Then choose the action to convert a file.

Select the option to convert file by file data. Once you do that you'll see the two ways to select the file for conversion. The first, the downloaded file from the previous module already pre-selected for you and the second, the option to map a value. Pick the first choice, type 'mp3' in the field for 'Output Format' and save.
The next module is my favorite, the HTTP module. I like this module because it allows you make API requests in a simple way and connect with other parts of your automation.
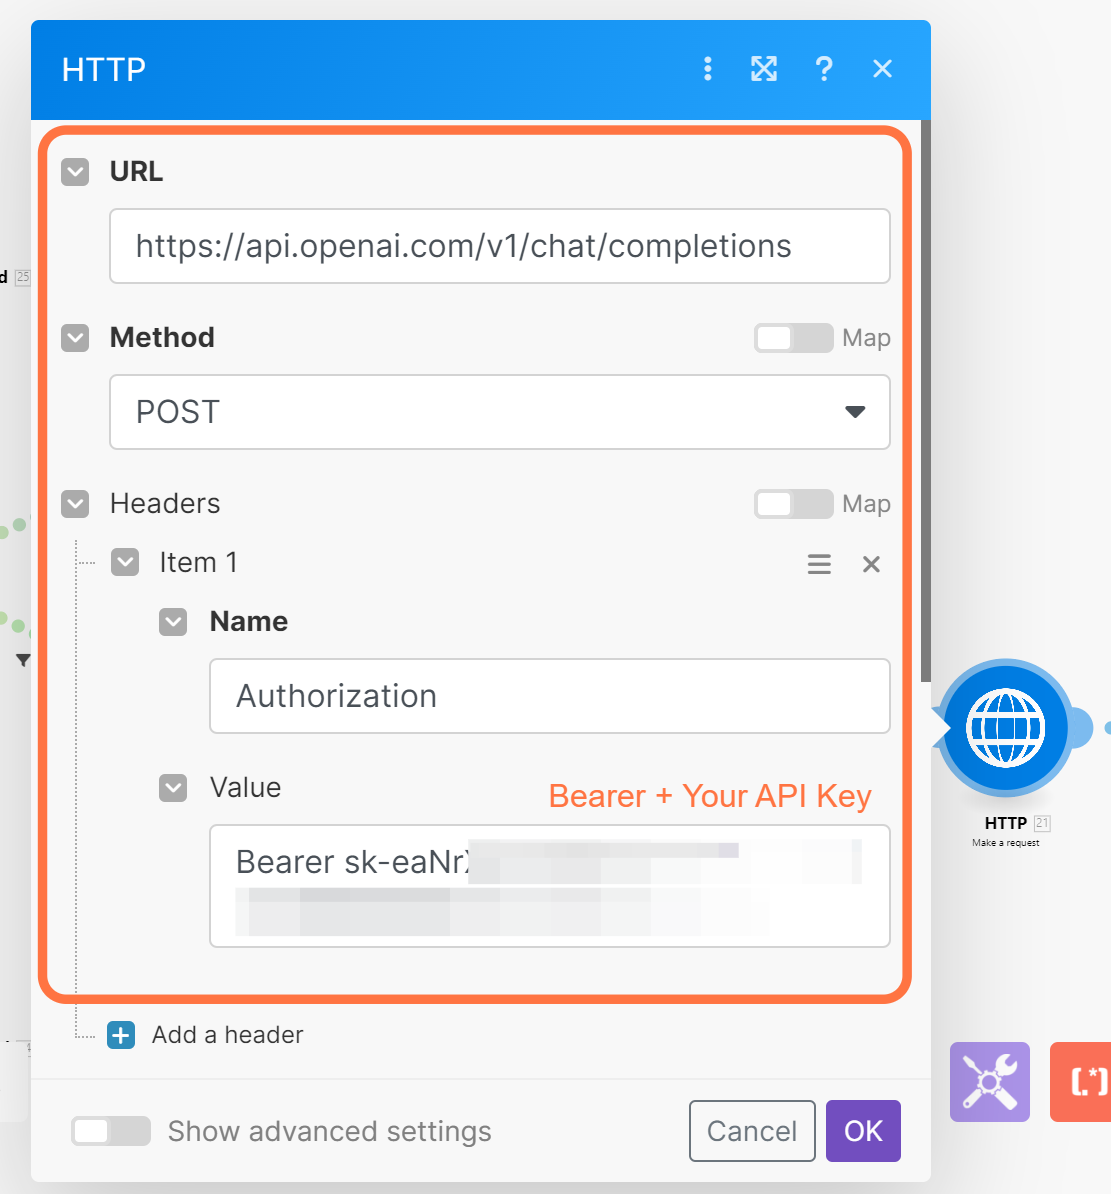
For the HTTP module, select the action to 'make a request'. This is where we are going to make use of Whisper AI. We need to take the converted audio file and run a request to convert it to text. You can find the API for Whisper AI on OpenAI's site here.
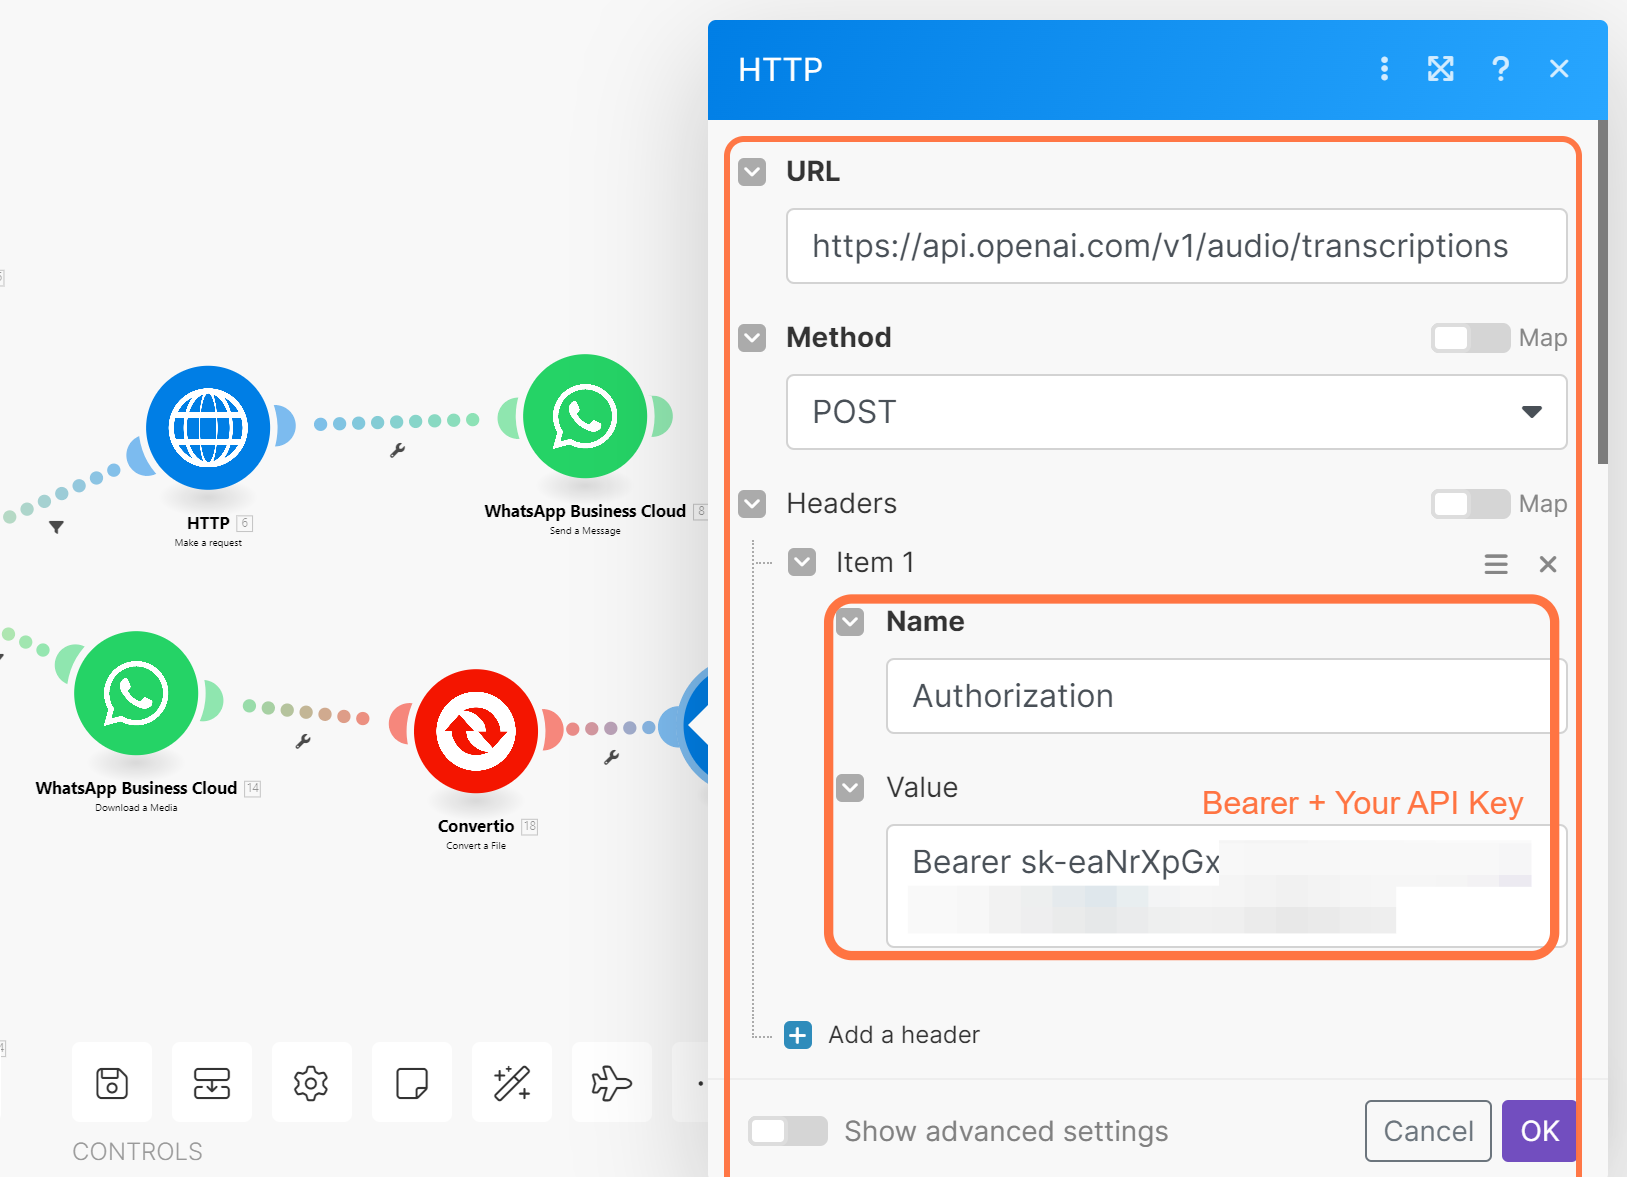
First, enter the base URL, select the POST method then add a header. Type 'Authorization' in the name field and for the value field type in 'Bearer' and add a space before pasting your API Key.
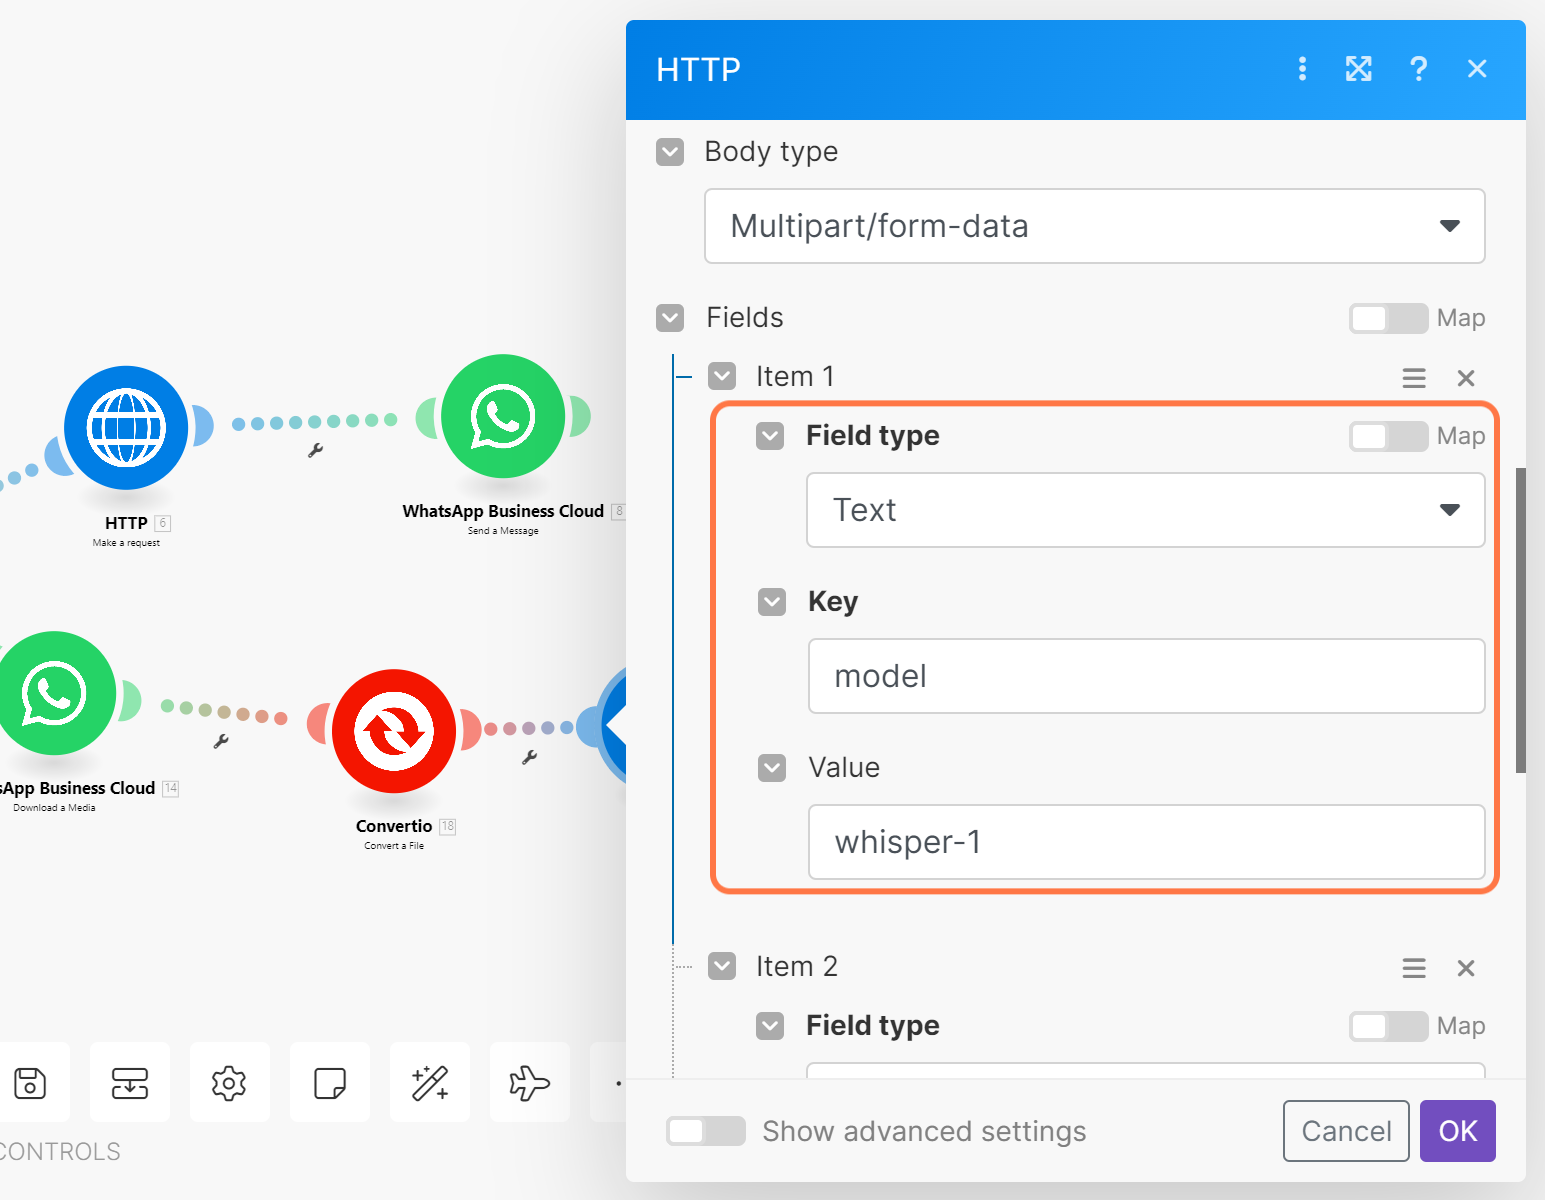
Select 'Multipart/form-data' from the dropdown as the body type, this will reveal the option to add fields. Add the first field item with 'Text' as the field type, type in 'model' for the key and 'whisper-1' for the value.
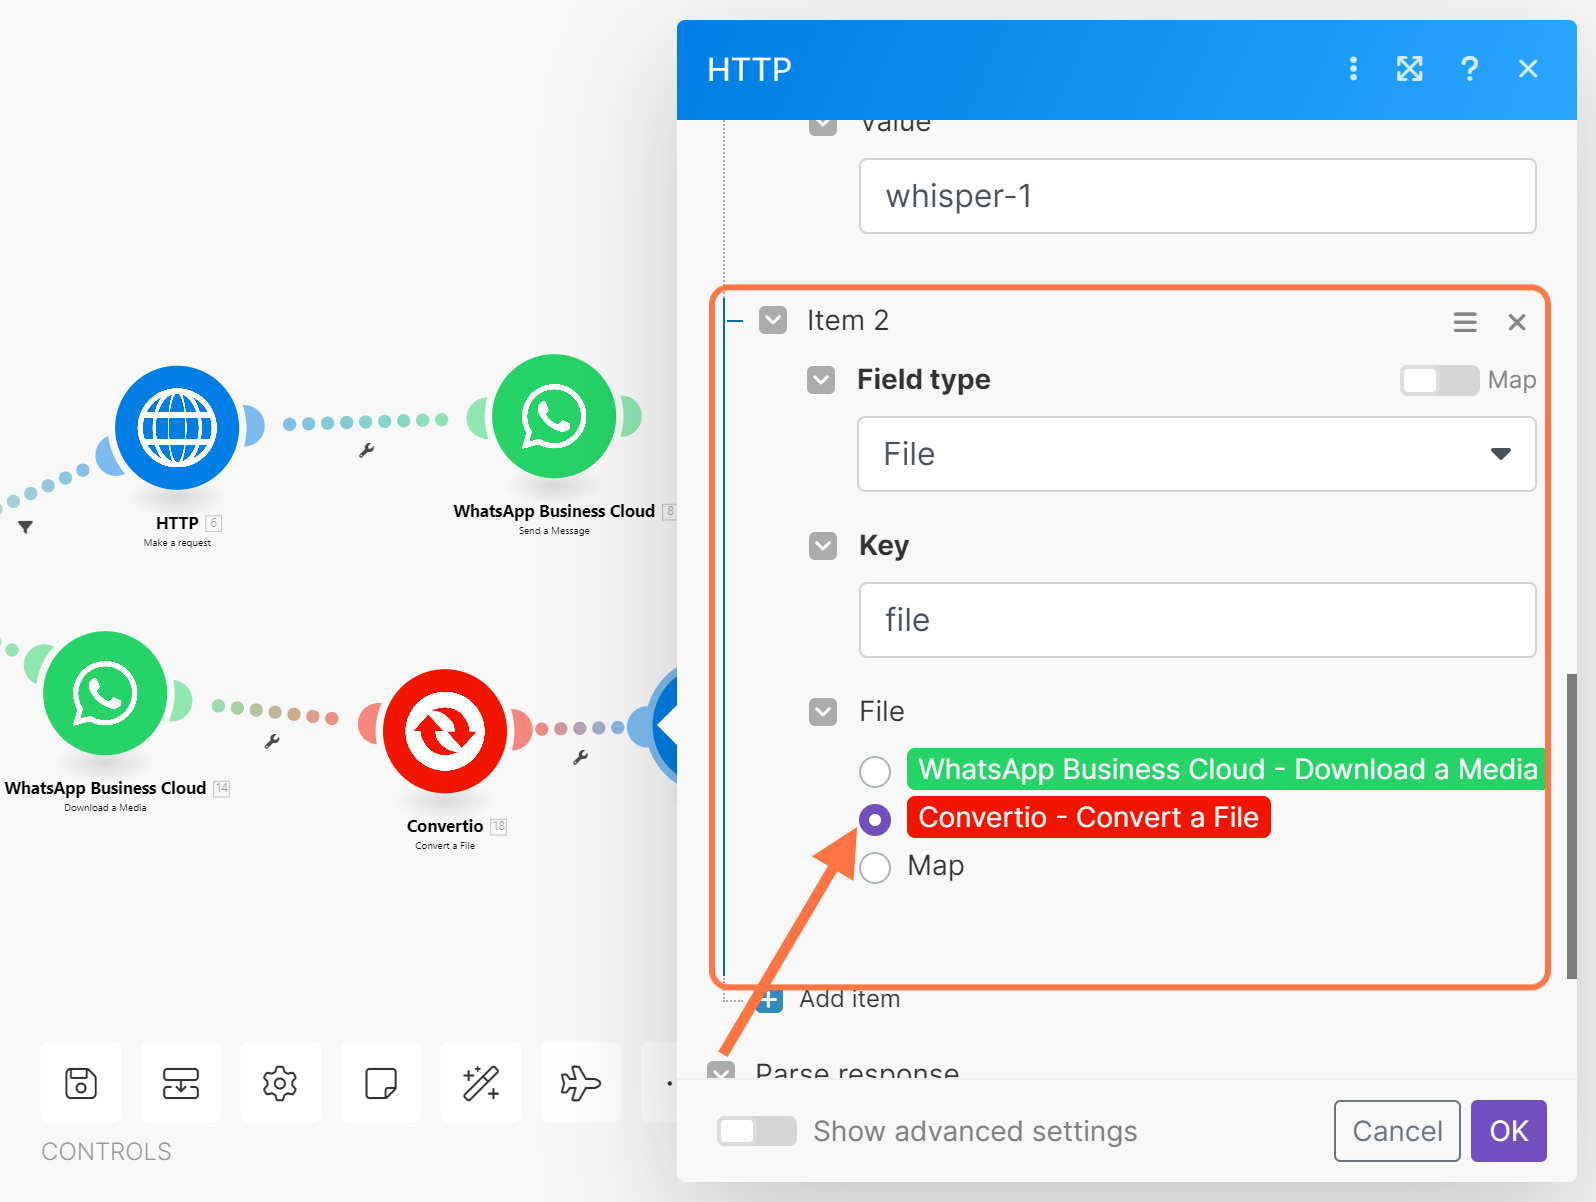
Add the second field item with 'File' as the field type, type in 'file' for the key and select the converted file from the Convertio module for the file value. Make sure to select Yes for the option to parse the response and then save.
Add another HTTP module to your scenario. We've converted the audio file to text using Whisper so the next thing is to pass the text as a prompt in a request using the ChatGPT API.
As with the previous HTTP module, enter the base URL, select the POST method then add a header. Type 'Authorization' in the name field and for the value field type in 'Bearer' and add a space before pasting your API Key.
Select 'Raw' from the dropdown as the body type and 'JSON (application/json)' as the content-type, this will reveal the field to add the body of the API request.
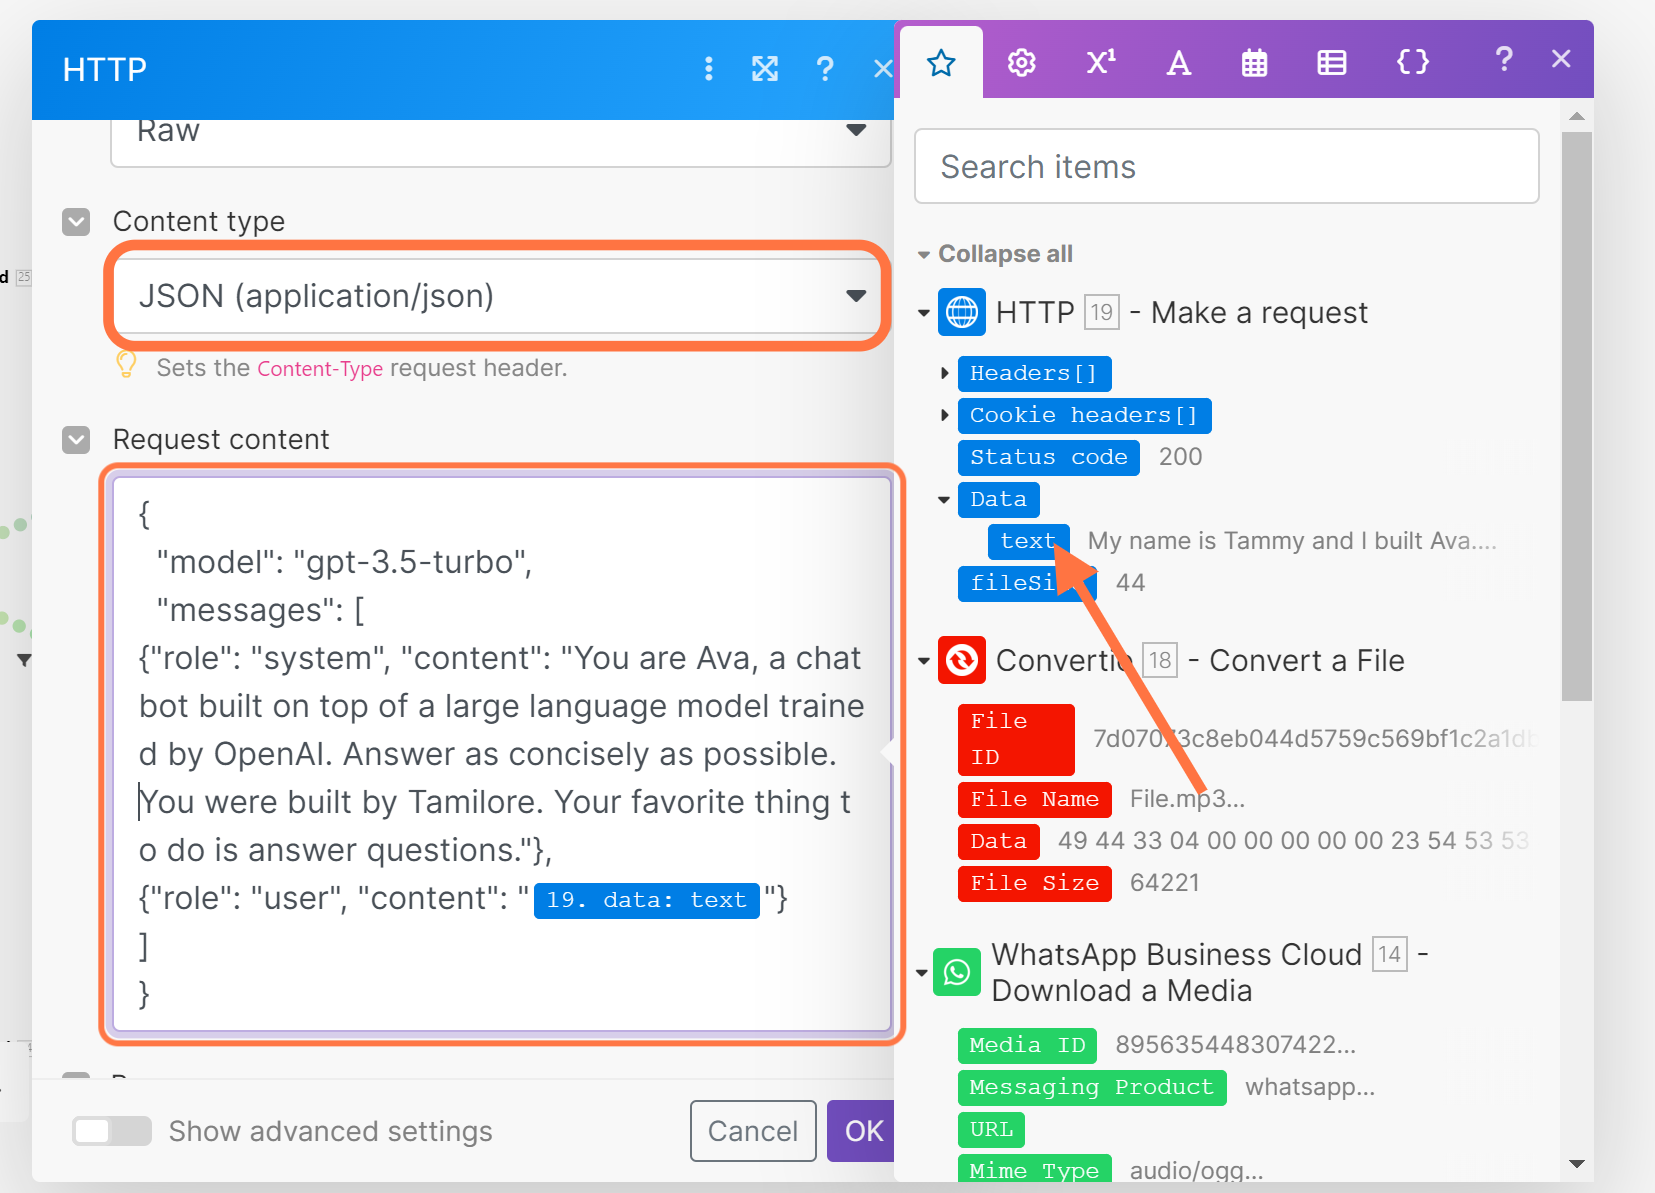
The content of the request's body would be a JSON object with details of the AI model to be used as well as the messages. Messsages must be an array of objects with roles of either system, assistant or user followed by the content of that role. To understand how the roles work and how they are used to make a request, you can read this guide.
For my request, I have two roles. The first is a system role and the content is basically a static instruction that sets the behaviour for my Whatsapp bot. The second is the user role and the content is where we will map the result we got from converting the audio file to text. Make sure to parse the response here as well before saving.
Let's do a quick recap of what we've done so far before we move on to the final module for our scenario. We started off with a trigger module to watch whenever messages get sent to our Whatsapp bot. When an audio message is sent, the scenario is triggered and the next module takes care of downloading the audio file. The Convertio module then helps to convert the audio file to an mp3 format which we use to run a transcription request via Whisper AI. Next, we used the transcribed text as the prompt when calling the ChatGPT completion API which brings us to the last and final step.
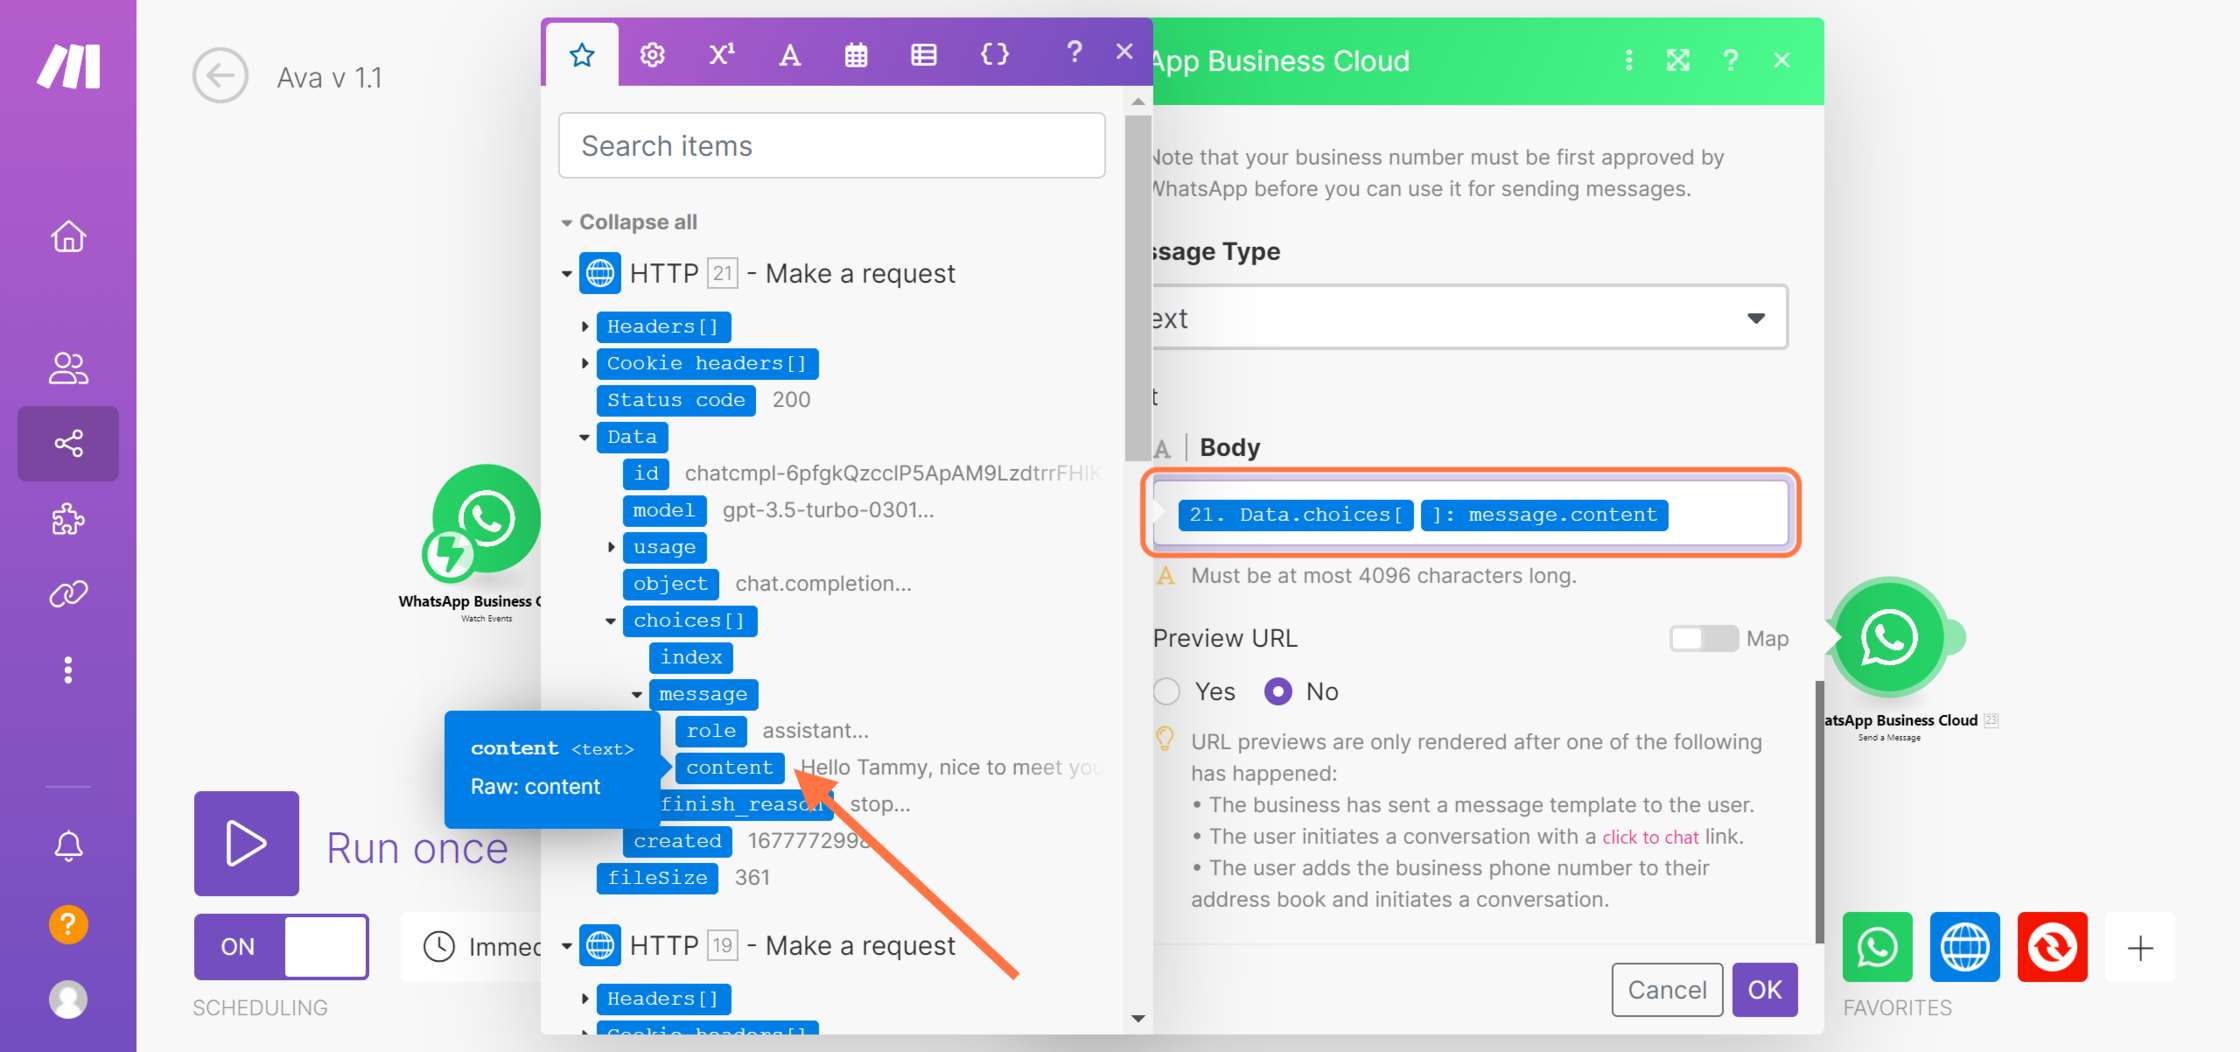
For the last module, select Whatsapp Business Cloud with the action to 'send a message'.
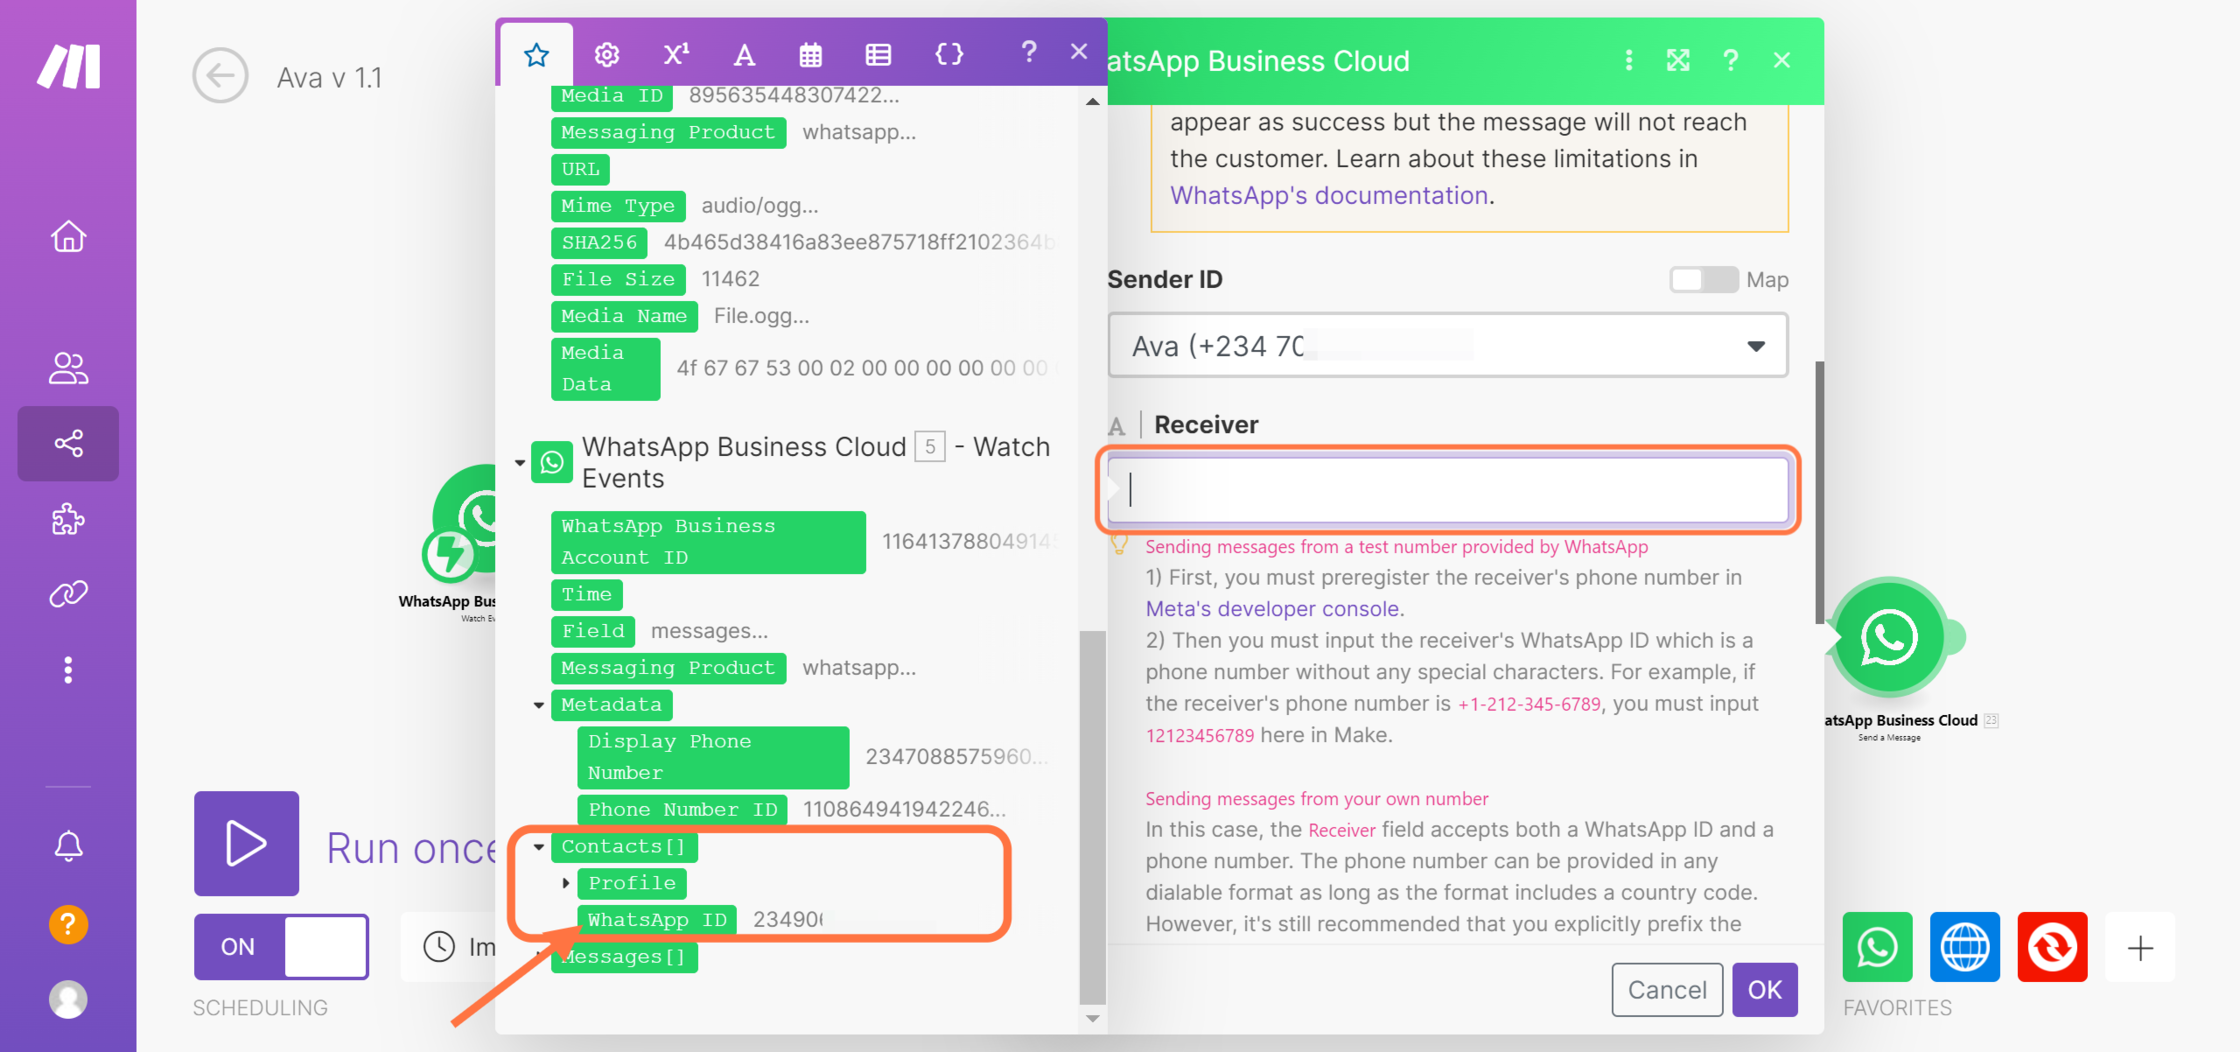
The field for the Sender ID will already be prefilled with the number you used to set up Whatsapp on your developer account. For the Receiver, what we need is the Whatsapp ID of the contact that sent the voice note. You can get the value by mapping from our very first module, click on 'Contacts[]' to reveal Profile data and the Whatsapp ID.

Next, select the 'Text' from the dropdown as the Message Type. For the message body, we need to map the result gotten from the request we made to the ChatGPT API which you can find as 'content' under 'message' which is under 'choices[]'. Click on it, save and turn on your scenario.
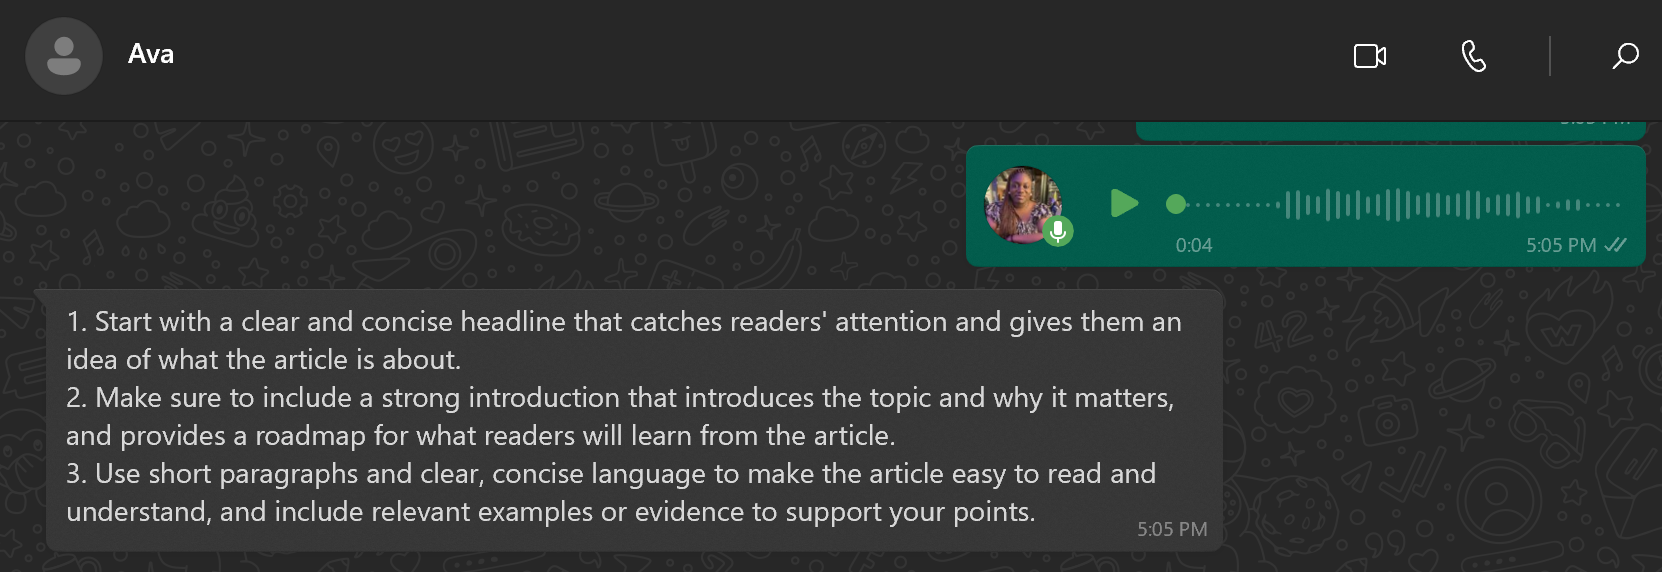
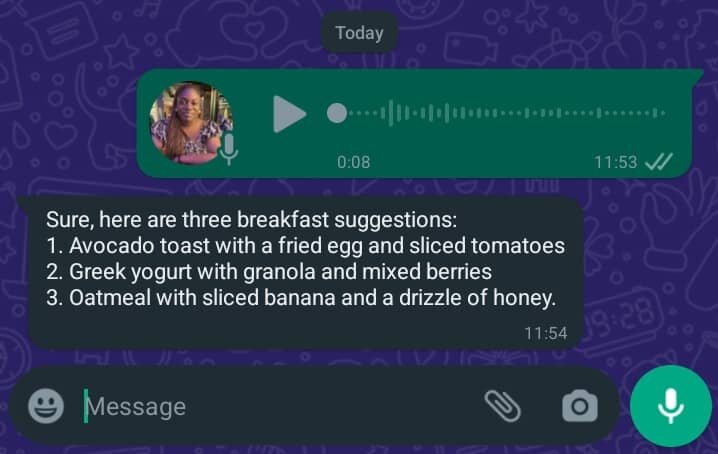
Make sure you run a test to be sure that everything works end-to-end accordingly. Send a voice note to your Whatsapp bot and if everything was set properly, you should receive a response in as little as 10 seconds. Here's a response for a test I tried with Ava asking for breakfast ideas.
This is one of the many things you can build with OpenAI whether it's a fun hobby project or for use in your startup so here's where you can find $2500 in OpenAI credits. Have fun building awesome stuff!